
We will start the cold and dark tutorials with PMDG DC-6, which at this moment is the best airplane for Microsoft Flight Simulator 2020.
we will fly from chania LGSA airport to athens LGAV airport, using vor navigations and airways. the flight will be divided in 2 videos, the cold and dark start part and the flight part. except the cold and dark start, we will learn some more things: vor navigation, following airways and finally ils landing with the pmdg dc-6
addons used: pmdg dc-6 airplane, justsim Chania LGSA airport, flytampa Athens LGAV airport, Navigraph charts and navdata, live msfs weather which was accurate.
hardware used: i7-8700 cpu, nvidia 2070 super locked at 30fps, 64gb ram, high to ultra settings, ms sidewinder joystick
in this cold and dark tutorial, we assume the use of a joystick with one throttle lever. if you have separate levers for throttles, rpm etc, then the procedure is totally different.
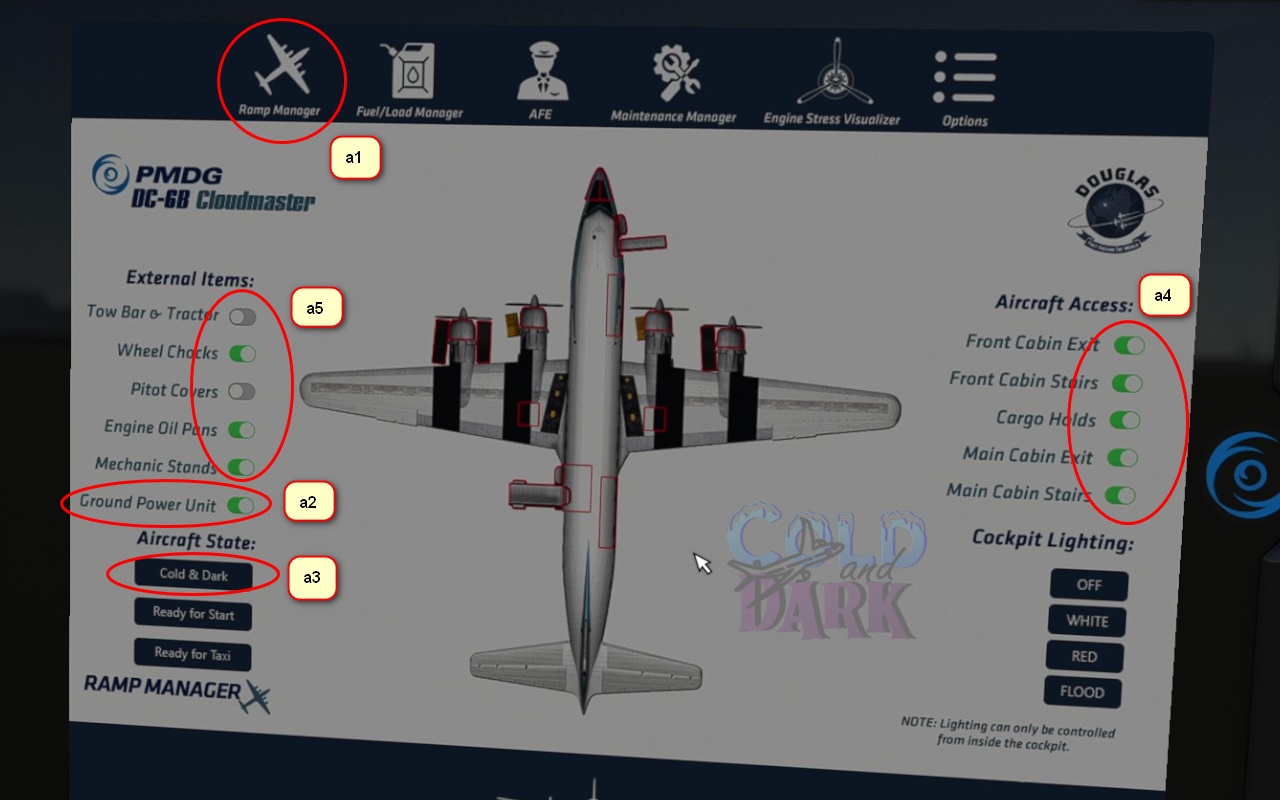

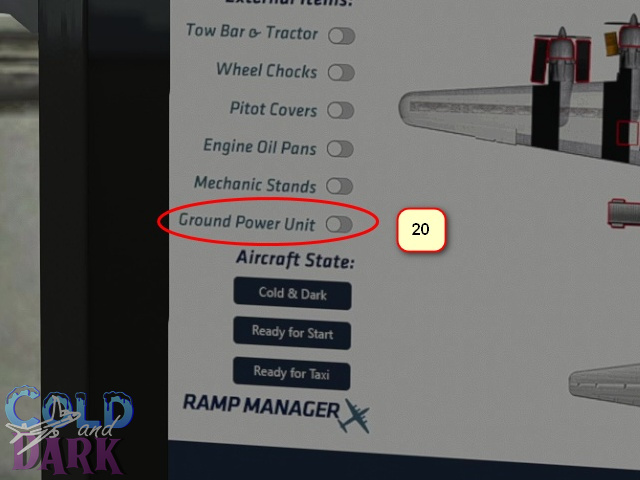
- go to the ramp manager at the efb (a1) and make sure that the ground power unit is connected (a2). it should be there by default.
note: if you are unsure about initial state of the airplane, you can press the cold and dark button (a3) to set it in the cold and dark condition. if you want, open the doors (a4) and use the ground services (a5).
- go to the maintenance manager (b1), repair all engines (b2), service all props (b3), top up with oil all the engines (b4) and top up all the fluids (b5).

- go to the overhead panel and move up the batt & pwr switch to … the batt & pwr position (1a). if you want, test the ground power connection by pressing the red light over the plane battery / ground power switch (b) – the red light will illuminate. then move down the plane battery / ground power switch to ground power position (1c), so our airplane will have electric power. the red light over the switch will light on.
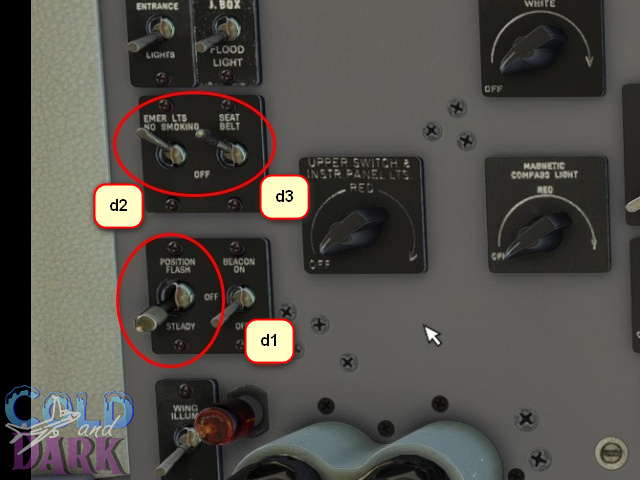
- move down the position lights switch to steady position (d1), and move up both the emergency/no smoking lights (d2) and the seat belt lights switches (d3)
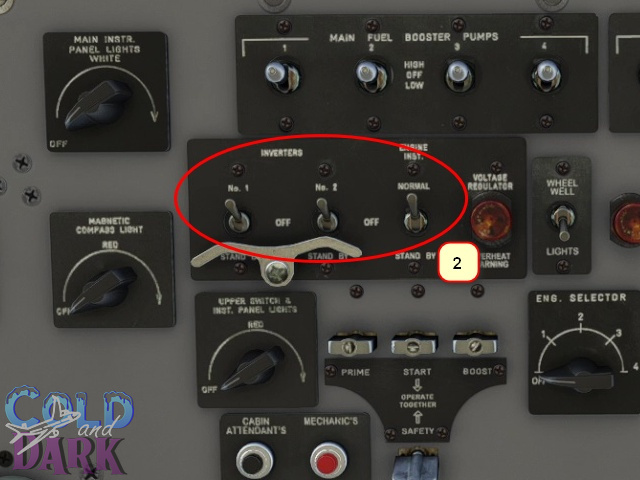

- move up the three inverter switches.
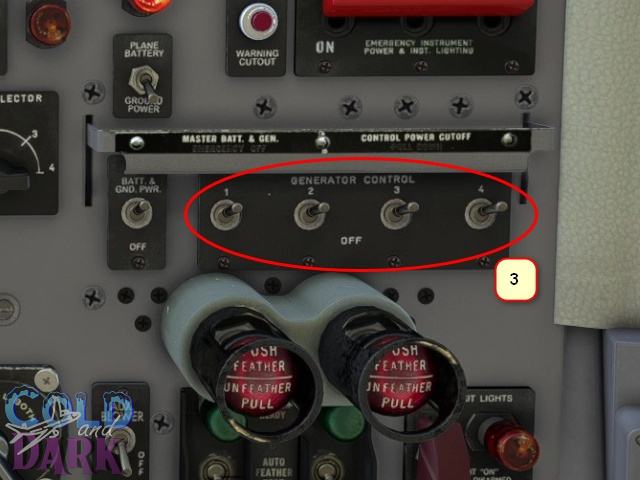
- generators on x 4
- cowl flaps open x 4


- cabin heater master switch on
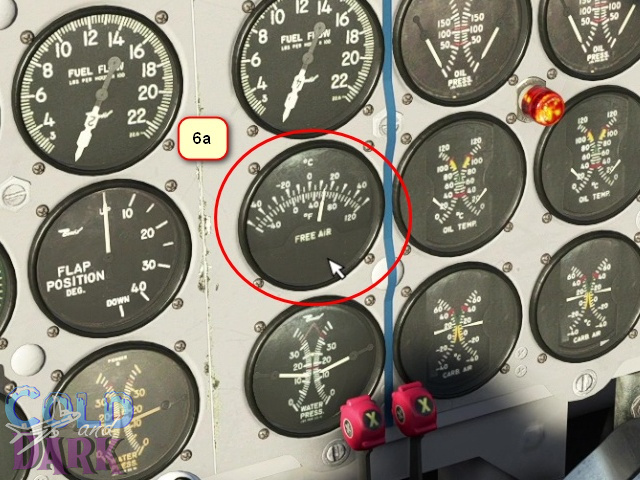
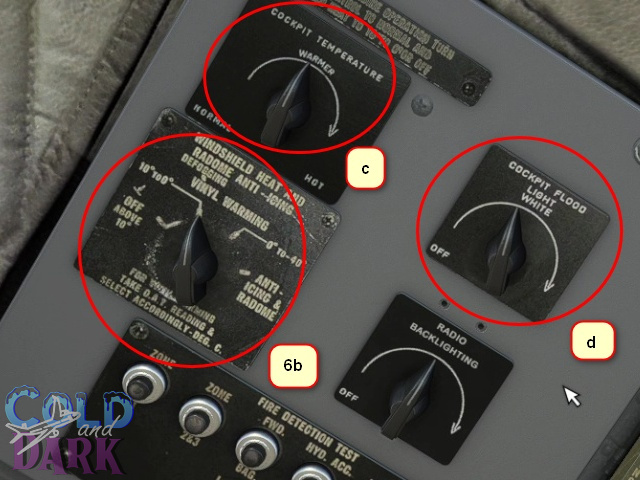
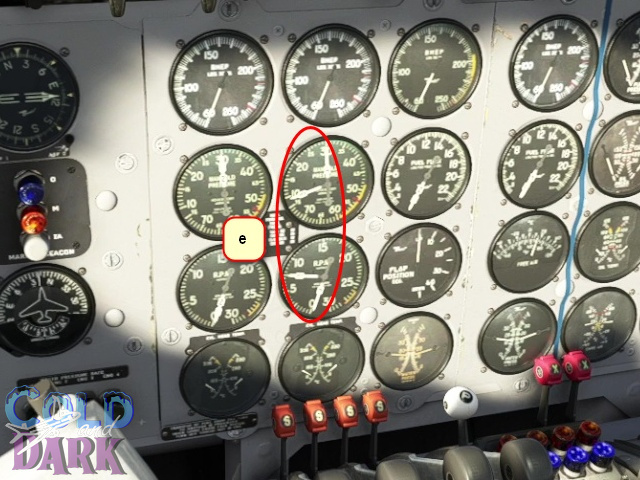
- check the outside temperature gauge (6a) and set the appropriate temperature for the windows heating (6b). you can also adjust the cockpit temperature (c) and illuminate the cockpit (d)
- push the four levers of the fuel tanks full forward to the main position


- radios on
note: if you will fly with atc, you can turn on the transponder (e) and apply the frequency given (f).
departure flight plan
we don’t have an fmc technology to make a full flight plan, so using the two nav radios we will fly from the departure airport (lgsa) to the first vor, which is mil. we will find all the necessary info using the navigraph charts.


- we depart from chania, LGSA airport, 108.60 SUD vor (a1), following the J56 airway (a2), course 10° (a3), to Milos island, 113.50 MIL vor (a4). our flight level will be 15000ft

- we insert the sud frequency to the active nav1 (b1) and we keep the mil frequency as standby (b2). then we insert the mil frequency as active at nav2 (b3) and the sud freq as standby (b4).
note: we need the departure airport vor frequency for two reasons: first, as a referring point for the 10° course, in case we don’t capture the mil frequency during departure and second, if something goes wrong during takeoff, to be able to return back. in an emergency situation like that, don’t forget the meaning of the runway names: for lgsa we have 11 and 29, 11 means you land at 110° and 29, at 290°. the above departure flight plan logic works like this: we takeoff at 110° and turn back to chania so we will fly the 10° course to mil vor based on the sud vor, having always an eye to nav2 needle in case we capture the mil vor. if that happens, we change the nav1 active frequency to mil vor and we fly the 10° course following the j56 airway based on mil vor.

- turn the right knob to set the cabin pressure – 15.000 ft in our example

- turn the knob (c1) at the course gauge to set the course at 10° (c2)
note: during departure, usually we set the course at the direction of the departure runway. due to the nature of our departure, we have to turn immediately to a northern direction to head to milos, and due to the nature of the aircraft – no lnav goodies – it is more safe to set the course at the direction of the j56 airway, to reduce the overall workload during takeoff.


- go the fuel/load manager (a) at the efb and load the airplane as you like
note: in case you have any doors opened or ground services used, it is a good time to close them now, through the ramp manager at the efb. be careful to leave the ground power on, till the engines start
Engines start


- make sure the parking brake is on (a) and all the throttles are to idle (b)
- move up the beacon lights switch to on position (c)
we will start the engines based on the 3 4 2 1 sequence
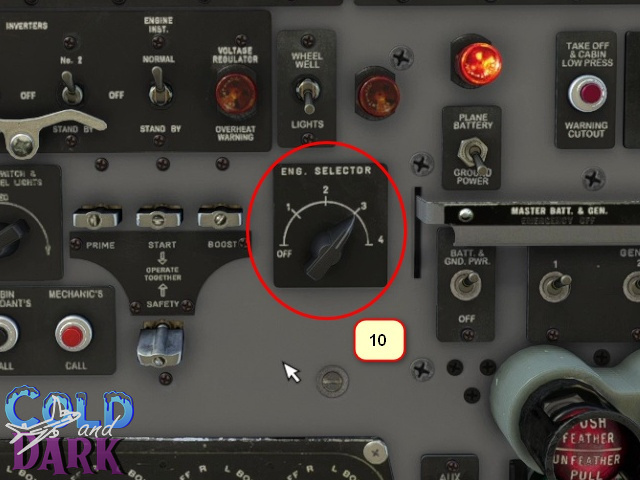


- engine selector switch to position 3
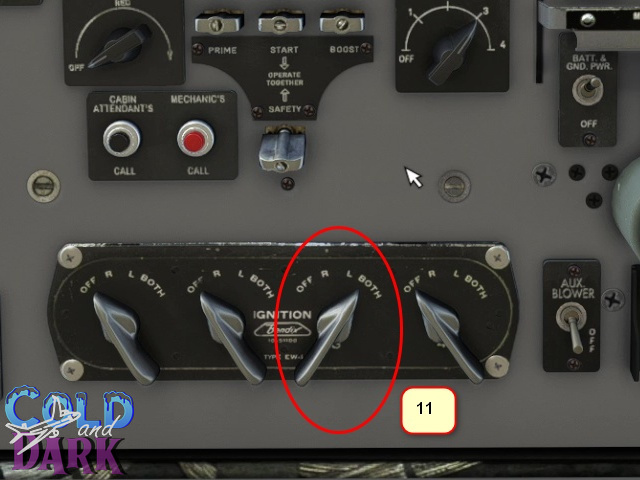
- ignition for engine no 3 to both position
- move up to rich position the engine no 3 mixture lever
- move down the main fuel booster pump no 3 to low position. we have pressure indication at the fuel pressure gauge for engine no 3 (d).


- press on the safety or the start switch which will move simultaneously both the safety and start switches. a count of 3, 6, 9, 12 will begin.
- after 9 press the boost switch (15a) and around 12 press the prime switch (15b).
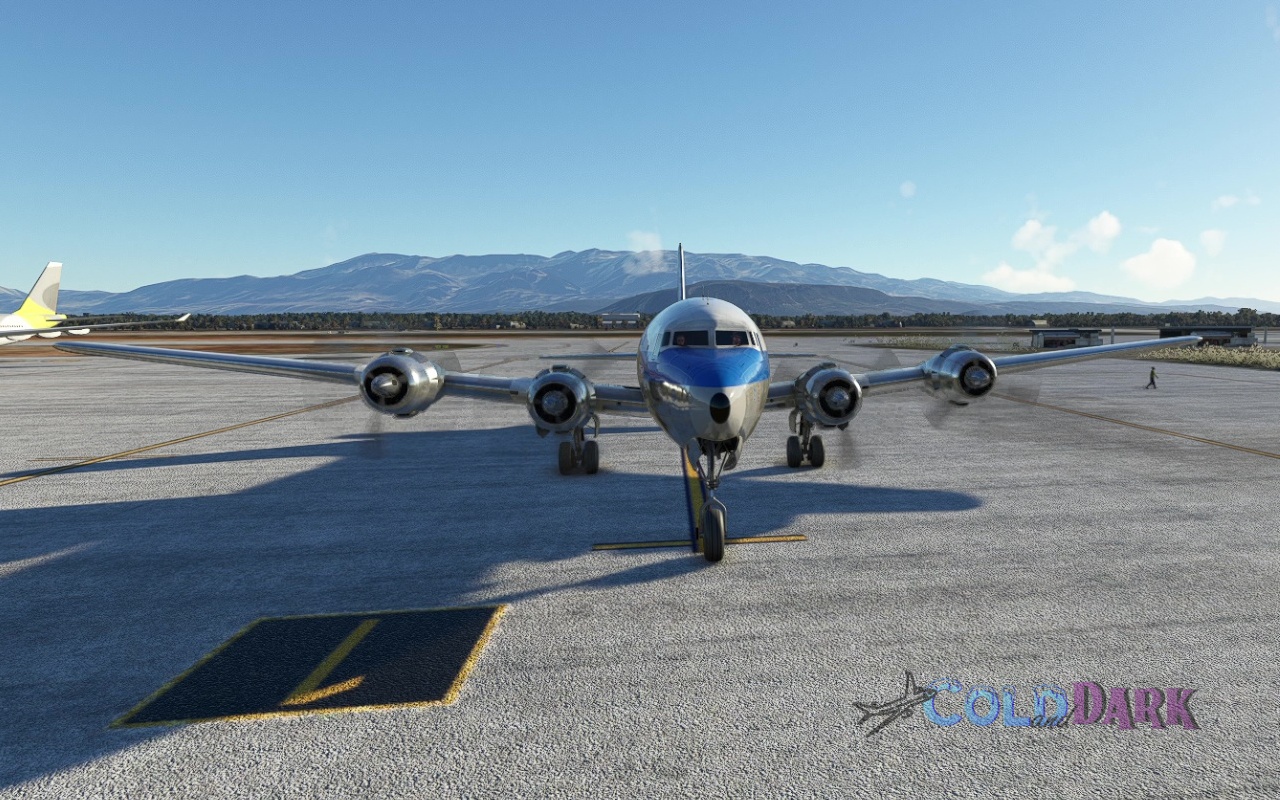
- the engine no 3 will start, we hear the sound, we can check the gauges to see the needles for engine no 3 are moving (e) and of course we can check the external view (f). back to overhead panel and wait till the safety, start, prime and boost switches to come automatically back to their initial positions (g)
- we repeat steps 10 to 15 for engine no 4, 2 and 1. (ex: engine selector to 4, ignition 3 to both, mixture lever 4 to rich, main fuel booster pump 4 to low, press safety+start switch, count 3 6 9 12 begins, after 9 press the boost switch and around 12 press the prime switch, engine no 4 starts, wait for the engine start switches to come back to their initial position and continue to the next engine)


- overhead panel and move all the main fuel booster pumps to off (middle position)
- move all mixture levers to lean position
- raise and keep the rpm for all the engines to around 1000-1200 (24a). our target is to achieve an oil temp of at least 40c for all the engines (24b). till then don’t go over 1200 rpm. then we can raise more the rpm.

- overhead panel and plane battery / ground power switch to plane battery (25a).
- then go to the ramp manager at the efb to disconnect the ground power unit (25b)
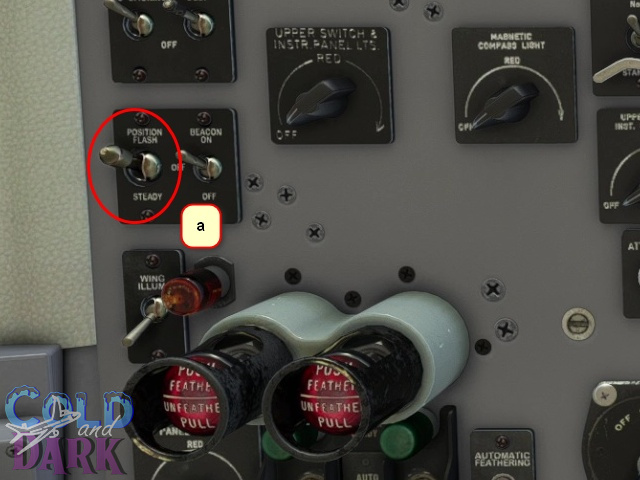
- in case you need push back, it is a good time to do it now. go to overhead panel and move up the position lights switch to the flash position so people around will know that the airplane is going to move.
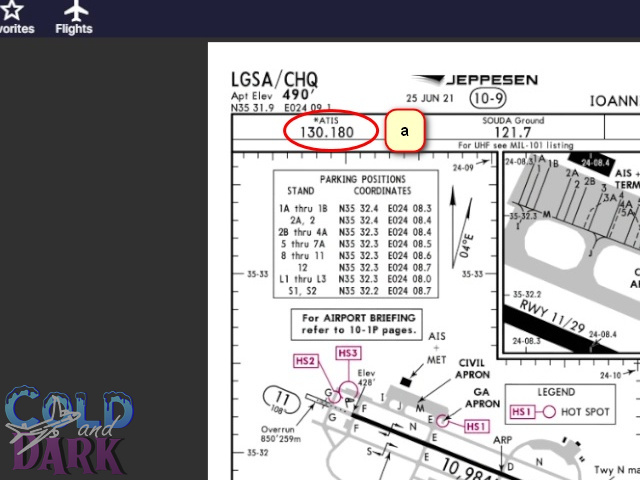
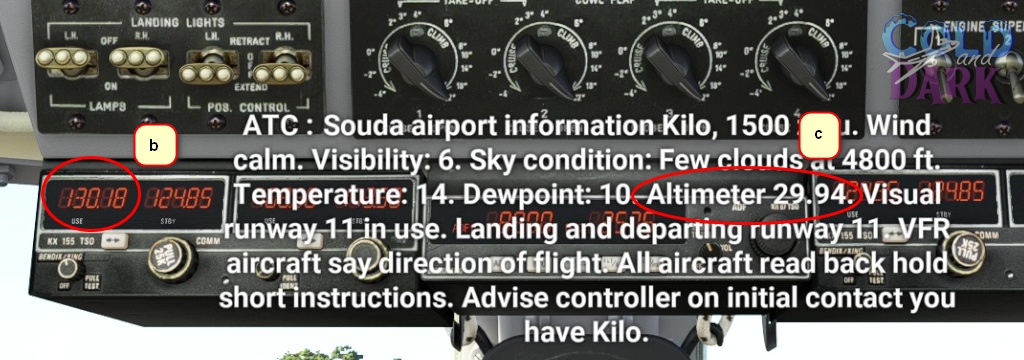


- set the local barometric pressure, there are many ways to do that. the most easy way is to press the b key and both barometers will be adjusted automatically. for education purposes we will do it manually: get the the atis frequency of the airport from the chart – 130.180 for LGSA (a) , insert it to the radio (b), listen to the message and get the pressure value (c). turn the knobs (d) to insert the pressure value to both barometers (e).


- when the oil temp for all the engines is over 40c (22a), raise the rpm to over 1500 (22b), where there will be no vibrations.


- press on the handle to release the gust lock lever.
- move the flaps lever down three times (24a), to 20 degrees position and verify on the flaps gauge (24b)

- turn on the landing lights by moving the four switches down (a) and taxi to the departure runway. in step 21, atis advised as to depart from runway 11, so there we will go


- move all the mixture levers up to the rich position
- overhead panel and move down all the main fuel booster pumps to low position
- set cowl flaps to takeoff position
- move up the static vent pilot & scoop heaters switch to on. note here that the max ground operation should be 1 min. so do that only if your taxi time is very fast. otherwise you can turn it on the last moment before takeoff
- start the flight timer by pressing first on the left knob of the clock – changes between current time mode or timer mode (a) and then on the right knob (b)
and have a good flight !!!